MIDI-Master 2.7 Manual
Whats new and update hints
If you have already used a previous version of MIDI-Master, please read the documentation What's new in MIDI Master 2.7. There you will find tips to improve your current configuration.
Take some time and please read this manual
MIDI-Master is a software that handles MIDI data in real time in various ways. To work with this software, it's important to have good basic knowledge of the workings of MIDI. Please read this manual carefully to understand the function of MIDI-Master. Maybe you will find some suggestions how MIDI-Master can serve you.
First Step - Setup
MIDI-Master must first be set up.
MIDI-Master needs to know which MIDI devices are connected to your computer.
The dialogue for these settings can be found under the menu item Setup / MIDI.
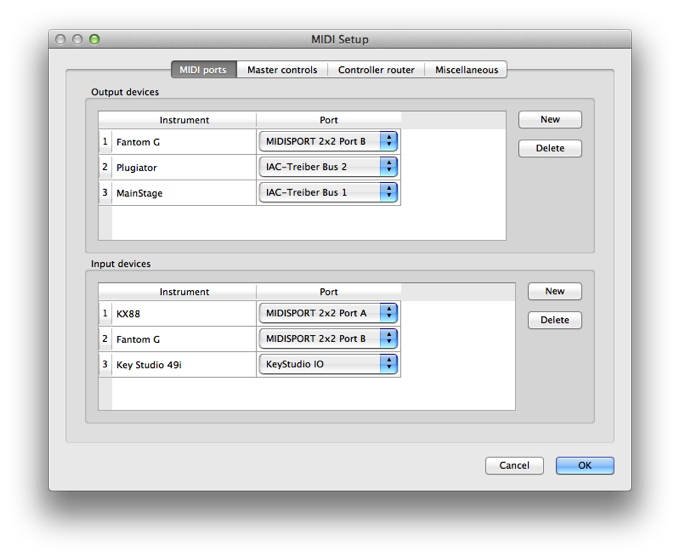
In the first tab MIDI ports, the input and output ports will be registered and named.
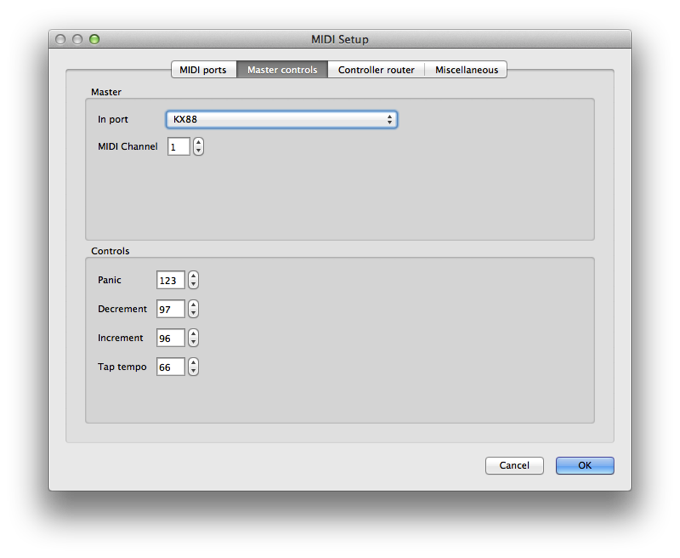
The second tab Master controls contains - channels, port and controllers defined. These are used to control MIDI-Master from your keyboard or controller. The patches of MIDI-Master can be switched by program changes that are received on this port and channel. The following four controllers on this MIDI in port and channel have the following tasks:
-
Panic
If the controller of this setting is received, then all-notes-off will be send to all registered MIDI out ports and channels. -
Decrement / Increment
Here you can either switch your patches (stepwise +1 or -1) or when you have activated a performance-list you can switch your patches stepwise within that list (Very comfortable for live performances).
-
Tap tempo
With this Controller you can set the MIDI-Clock speed by tapping.
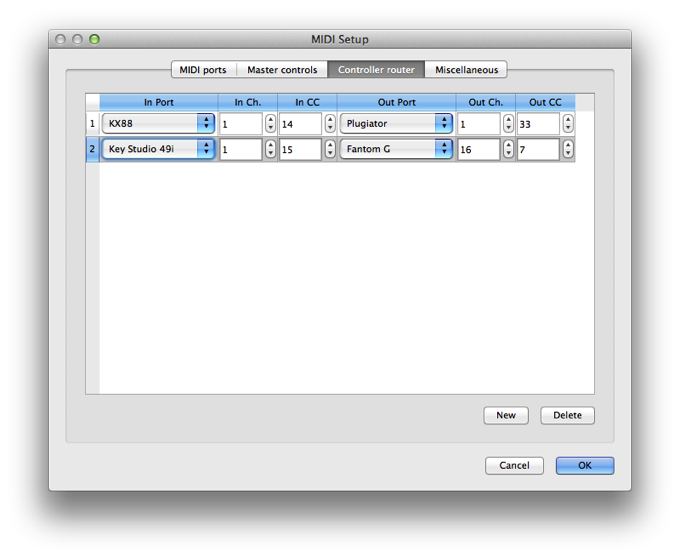
The third Tab Controller router lets you define controllers that are permanently active and independent of the zones of your patches.
For example, this can be used to control the master volume of a MIDI-capable console by a fader of your keyboard.
This setting is global for all patches. These controllers should not be used in the zones of your patches.
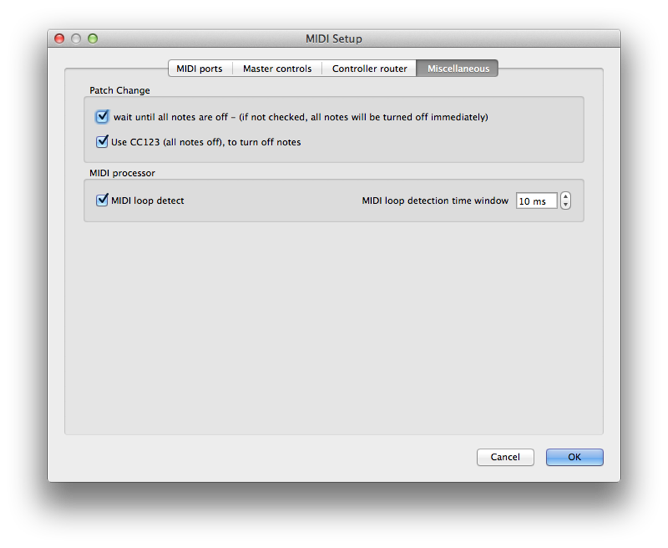
The 4th Tab Miscellaneous defines how MIDI-Master behaves when a patch changes while notes still sound.
If the Checkbox wait until all notes are off is checked and a Patch-Change event is received,
MIDI-Master waits until all notes are off before activating the new patch.
If you have some older syntesizers such as the Yamaha DX7/TF1/TX7 in your setup, you should uncheck the checkbox Use CC123 (all notes off) to turn off notes
because these older devices do not understand CC123. In this case all sounding notes will be turned off by note off events.
With active MIDI loop detect -function MIDI-Master automatically detects so-called MIDI loops.
These occur when the data sent by MIDI-Master arrive back at the input of MIDI-Master.
This is similar to a microphone feedback. These MIDI loops can occur from incorrect MIDI cabling or configuration of the Instrummente.
As soon as MIDI master detects a loop, a window opens with a message.
If you often get these messages and you are sure that the cabling and configuration of your instruments is correct,
you can try to reduce the time (MIDI loop detection time window) or completely disable this function.
Now MIDI-Master is ready for routing, splitting, switching and stacking.
To make things more comfortable yet another setup is necessary - define your instruments: Setup / Insruments.
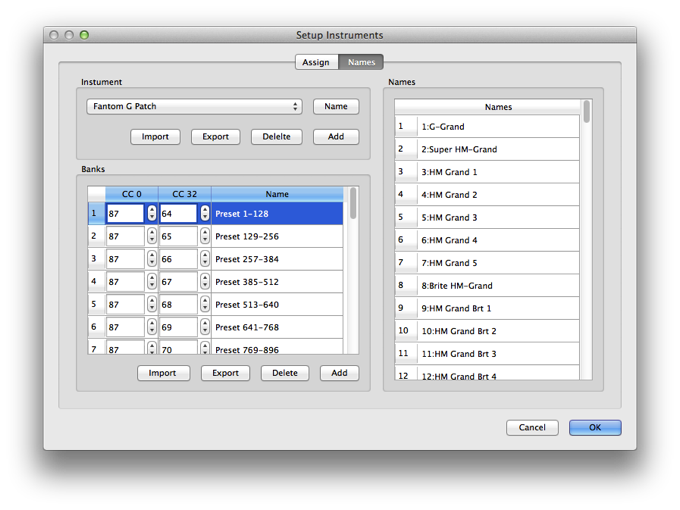
Under the Tab Names, you can define which banks and sounds are available for each of your MIDI devices.
You can set up your instruments manually or import already defined instruments.
MIDI-Master can import Cakewalk instrument definitions (*.ins), Avid (*.midnam), MOTU (*.midnam), and MIDI-Master format (*.mmi).
In the download section of www.midizone.de you can find some instrument definitions,
and you can simply import them into MIDI-Master. You can also export your instrument definitions and make them available for other users. The export is in the Avid format (*.midnam).
We are happy if you send us your instruments definitions via e-mail to midimaster@assoftware.de
We will then provide them with reference to the author (if you want) in the download area for other users.
(If your instrument does not require the controller 0 or 32 then you can enter a value of -1)
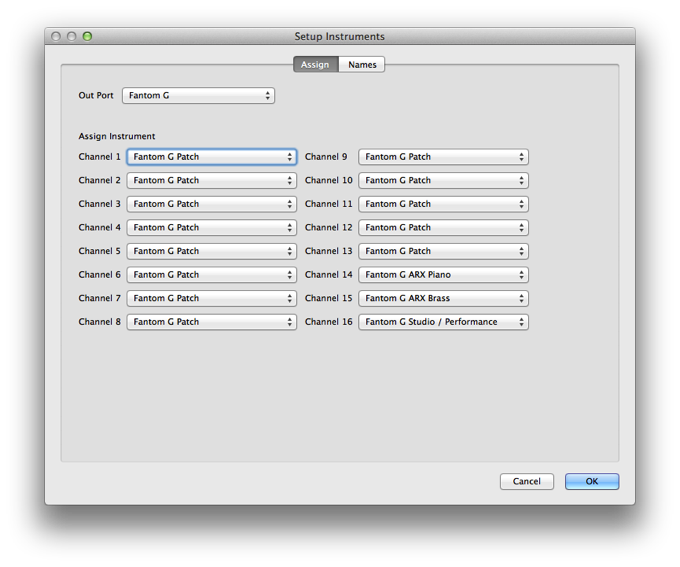
When you have defined your instruments, you must assign the corresponding MIDI ports and channels.
You can do this in the same dialog in the tab Assign.
At first, select a MIDI port for which you want to adjust the assignment.
Each of the 16 channels of the currently selected port can then be assigned to a instrument definition.
You must repeat it for all MIDI out ports.
The patches of MIDI-Master
Once you've made all the settings, then you can finally start on the real things, the definition of patches in the main window.
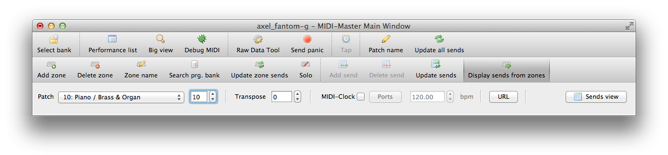
The main window has three main components.
First, at the top is a toolbar, where all important functions are accessible with one click.
The functions below the toolbar are described from left to right:
- A selection box for the current Patch and a numerical entry field for the patch number. Here you can select the desired patch of MIDI-Master.
-
The Transpose function:
This allows you to set a transposition in semitones. The transposition is valid for all zones of a patch. This transposition will be added to the individual transposition from each zone. -
MIDI-Clock:
If this checkbox is activated MIDI-Master sends MIDI clock signal (quaterframes) to the MIDI-out ports enabled for this at Ports. The tempo is entered in the input field right next to it as BPM. A speed change can be made in real time with the Tap controller. -
URL:
With this function you can set up a URL for each patch, which will start when you activate a patch.
Thus, for example can open a document or start a program.
For this URL, you can use the under the entryfield given placeholders for patch name, patch number and master transpose. These placeholders are replaced with the data of the patch. The patch name is thereby encoded into valid URL format. -
The button Sends list respectively Zones view:
This button will switch the view in the underlying main area between Zones view and Sends list.
The zones of a patch
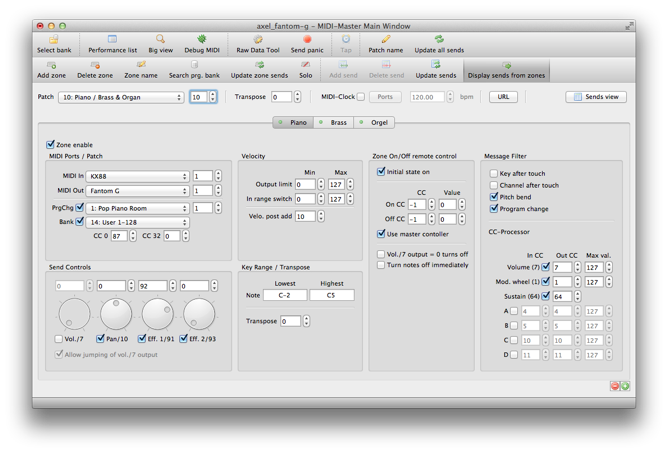
In the Zones view in the main area, the zones of patches are shown, each one with a tab. If for a patch no zone is defined, then this area is empty. You can add zones by using the menu item Zone / Add-Zone. (This function can also be found in the toolbar.)
A zone consists of the following parts:
-
MIDI Ports / Patch:
Here you can select the MIDI in and out port and set the channels to be used for this zone. Also, you can still choose a program change message including bank select command, which will be sent on activation of the patch. If you have defined your instruments with names for the program changes, you can also use the search function (choose zone / Search Prog Bank) to find a desired program change and bank. (The search function can also be found in the toolbar.) -
Send Controls:
Here you can define the value of the controllers for volume, pan, effect1 and effect2 on activation of the patch.
The option Allow jumping of vol./7 output specifies the behaviour of volume control. If this option is enabled, all CC7 commands are output directly. If this option is inactive, CC7 commands are output from the moment a value is nearby the Send controls / vol./7 value. This avoids volume jumps (The controller that you use for volume will be "snapped"). -
Velocity:
In this area can be determined which velocity values are sent to an instrument. Limit Min and Max is used to limit the range of dynamics. If your keyboard sends a value outside the limits specified here, then the output will be raised to Min or limited to Max. If you don't want any dynamics, you can set both values to the same value, such as 100.
Switch Min and Max defines a dynamic range for which Note On/Off events will be transmitted. Here a so-called velocity switch between two sounds can be realized with a second zone.
With Add you can set a value which is added to the velociy. This results is a strengthening or weakening of the velocity. -
Key Range / Transpose:
Note Low and High sets the range of notes to be used for this zone on your keyboard (split). You can enter the note values here via computer keyboard or directly from your MIDI keyboard. As soon as the text is marked in these fields, such as by a double click, the note value can be entered via MIDI keyboard.
With Transpose you can transpose, the output of note values in semitones up or down for this zone. -
Receive Note Events Remote Control:
If you want to turn a zone on or off while playing your keyboard, you can define control change events to accomplish this. One event for on and one for off. Initial state on determines whether the zone is on or off when a patch is activated.
With On CC you define a controller (CC) and its (Value) to turn on a zone. With Off CC you define a controller (CC) and its (Value) to turn off a zone. A value of -1 at On CC or Off CC means that the function is disabled. If the Checkbox Use master controller is activated, then this function is not controlled by the MIDI port and channel of this zone. In this case the MIDI port and channel, which is set at Setup / MIDI / Master controls will be used.
With the option Vol./7, output = 0 turns off you can turns the zone on and off by volume control. Therefore when a value of 0 is sent for volume (CC7), the zone will be turned off. Your instrument will not use a voice for the zone. In this case a fade-in is not possible. A value greater than 0 will turn the zone on again.
The option Turn notes off immediately will immediately turn off all active notes by switching off the zone. A pressed hold pedal (CC64) is also reset by switching off the zone.
A deactivated zone can be identified by the yellow indicator on the tab of the zone. A active zone has a green indicator. -
Message Filter:
The Message filter can selectively filter out or allow data such as Key aftertouch, Channel aftertouchPitch bend and Program change. This is used for data reduction as well as using the data for a particular zone only. For example, many synthesizers don't support Key aftertouch.
CC-Processor:
The CC Processor allows you to adjust up to 7 controllers per zone. Three of these controllers are predefined - Volume (7), Modulation Weel (1) and Sustain Pedal (64). The controllers A, B, C and D can be defined by the user.-
In CC is the controller number that is sent from your MIDI keyboard.
If your MIDI keyboard has faders or dials in addition to other standard controllers, you can for example use one of these to control the volume of a zone. In this case, activate one of the definable controllers, such as A, and set In CC to the number of the controller of your MIDI keyboard. Then enter 7 for volume controller at Out CC and disable In CC / Volume (7). Now you can control the volume for that zone with another controller. -
Out CC is the controller number to which In CC will be converted.
It is possible to regulate, for example the volume of a zone by the modulation wheel In CC / Mod Wheel (1). In this case enter 7 (Volume controller) in Out CC and disableIn CC / Volume (7). -
Max val. sets the maximum value that can sent from a controller.
With this, the output value is scaled linear from the input value 0-127 to the output 0-Max val.
Example: You have defined 2 zones as a layer and want to control the volume of both together by the same controller. The instrument in the 1st zone has a value of 100 as the desired maximum value, while the next instrument in the 2nd zone has a value of 127 for the desired maximum volume. So make the Max val. of the first zone 100, and for the second 127. Now the volume for both zones can be be controlled together in proper proportion.
-
In CC is the controller number that is sent from your MIDI keyboard.
You can specify a descriptive name for each zone. With the menu item Zone / Zone name open the corresponding dialog. In this simple dialog, you can enter the name for the current zone. (This function can also be found in the toolbar.)
If you have created multiple zones for a patch, it can be very helpful during programming that only the zone located in the foreground is active. There is a function in the menu for this: Zone / Solo. This function can be switched on and off. (This function can also be found in the toolbar.) All disabled zones with this function have a red stroke through their indicators on the tabs.
If you want to delete a zone, use the menu item Zone / Delete zone. Deleting a zone is final. All data of this zone will be permanently deleted.
If you want to just disable a zone without deleting it, so you can use the zone again later, you can disable the checkbox Zone enable. A zone disabled in this way will have a red indicator on it's tab.
It is possible that during the programming of the zones, that program change commands or Send Controls no longer correspond to the settings of the instrument. To rectify this, use the Zone / Update sends option in the menu, to send the program change commands and send controls again. If this function is called, the program change commands and Send Controls for the current zone will be sent again. (This function can also be found in the toolbar.)
If you want to send all data for the active patch again, please use the menu item Patch / Update sends. (This function can also be found in the toolbar.)
Sends list of a patch
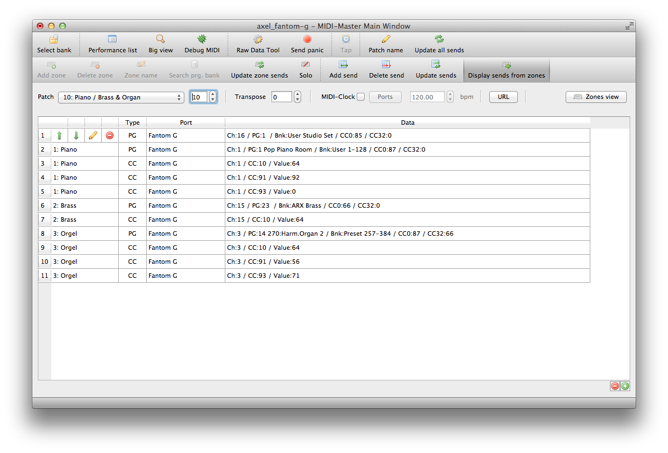
In the Sends list in the main area you can edit and define MIDI messages that will be sent for a patch, such as program change, control change and raw data.
You can add Sends by selecting the menu item Send / Add-Send. (This function can also be found in the toolbar.)
These commands will be send first when a patch is activated.
This allows you to activate global setups of your synthesizers and to control your effect devices for each patch.
After sending raw data as well as program change commands, it may be necessary for your instrument to have a short break of a few milliseconds to process these commands.
The time for this break can be entered in the dialogs to insert program change commands, and raw data.
(See also Raw Data Tool)
To see all the MIDI commands that MIDI-Master sends for a patch, you can you can use the function Sends / Display sends from zones. If this is active, the sends from the zones are shown in the sends list. The displayed sequence is exactly the order of transmission.
Patch Name
When you have programmed the zones and settings for a patch, you should then give your patch a descriptive name. The menu item Patch / Patch name will open the corresponding dialog. In this simple dialog, you can enter the name for the current Patch. (This function can also be found in the toolbar.)
Select Patch Bank
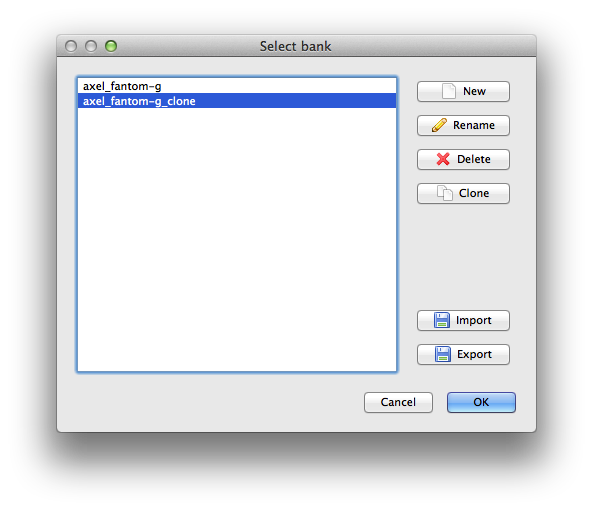
All the settings in the patches are stored in a bank, with 128 patches stored in each bank. The most recently used bank is loaded automatically at startup. The menu item Bank / Select bank opens a dialog to select and manage banks. With this you can also import bank files (*.mmb) that were created with an older version of MIDI-Master. (This function can also be found in the toolbar.)
Performance list
The Performance list window is opened via the menu View / Performance List
(This function can also be found in the toolbar.)
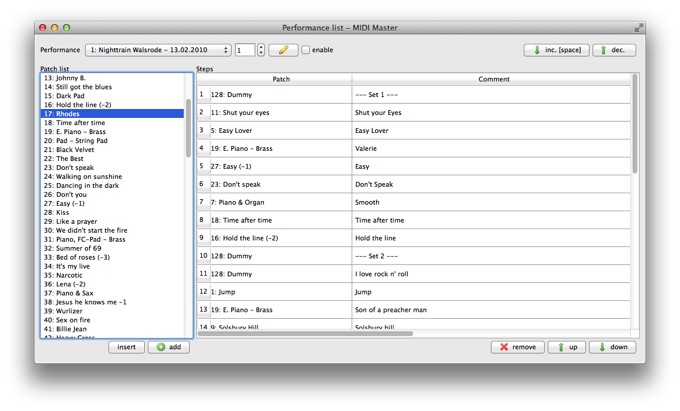
With a performance list, you can accurately organize a live show.
MIDI Master saves 128 performances in a bank.
In a performance list, you specify the order in which you need the patches of MIDI-Master for your live show.
First, select one of the 128 possible lists that you want to edit, from the top left.
You can change the name of a list by clicking on the button with the pencil icon.
Now you can select patches from the Patch list and add them to the Steps list on the right.
In the left column of the Steps list you can enter a comment for each patch/step.
The performance list is activated using the checkbox enable function. If a list is enabled, you can step forward by pressing the space bar. This activates your complete setup for the next song with the push of a button. This step forward and reverse switching can also be executed via MIDI. This is done using the increment and decremet controllers, which are defined at Setup / Master controls.
Big View
The Big view is opend via the menu View / Big view
(This function can also be found in the toolbar.)
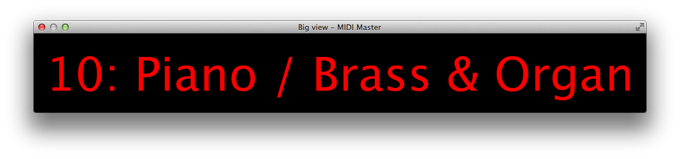
In the Big view window, the currently active patch name is displayed.
To make it easier to read this display from a distance, you can adjust the background, font colours and font size.
To make the adjustments, click the right mouse button in the Big view window,
then select the desired function from the popup menu.
Other functions
Send Panic
Send Panic
To solve the problem of hanging notes, simply choose the Utility / Send panic option from the menu. MIDI-Master then sends the all-notes-off command to all registered MIDI out ports for each channel. (This function can also be found in the toolbar.) The Send Panic function can also be triggered from a controller using the Panic controller, which is located under the menu item Setup / Master controls.
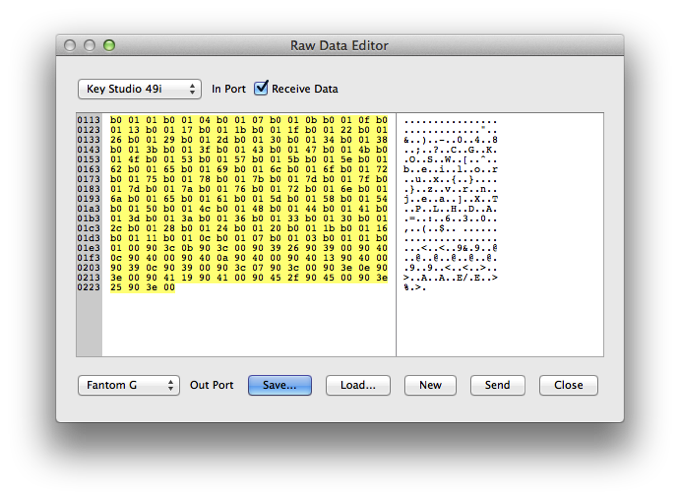
Raw Data Tool
The Raw Data Tool enables you to send and receive Raw/SysEx MIDI data.
You can save this data to disk and load it again later.
The data can be edited with the integrated hex editor.
Warning! This data should only be edited if you know exactly what you are doing!
This tool is launched from the menu Utility / Raw Data Tool.
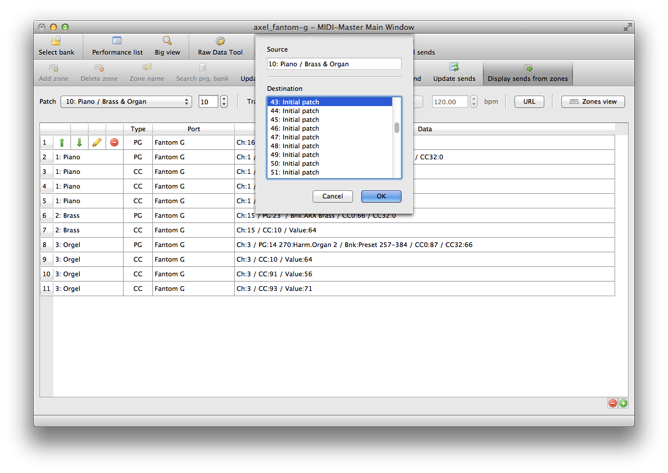
Copy Patch
If you want to create a new patch that requires virtually the same settings as an existing patch,
it is easier to use a copy of the relevant patch.
First, select the patch that you want to copy. Then open Patch / Copy Patch from the menu, and enter the target destination for your new copied patch.
By pressing the OK button, the data of the target patch will be overwritten by the data of the source patch!
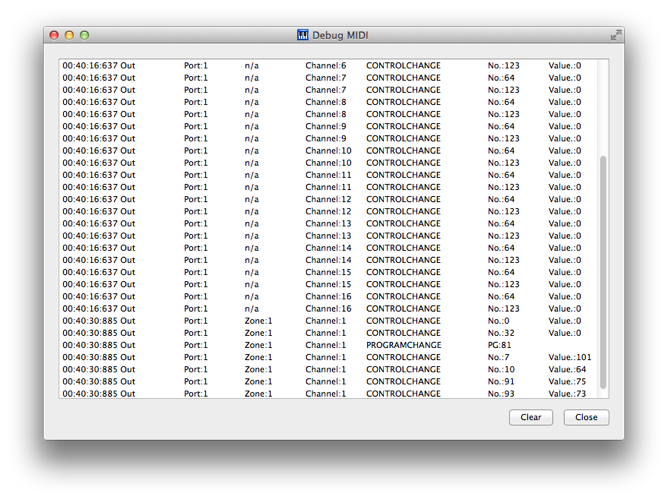
Debug MIDI
With this function, all (except MIDI clock events) of MIDI-Masters received and transmitted data is outputted in a window as text.
This can be helpful if you are looking for a problem in your setup or programming the patches.
It should be noted that this function generates a significant load on your computer at a large amount of MIDI data.
It is therefore advisable not to have permanently open this window.